In the dynamic world of AI and computer vision, we’re breaking barriers to bring you an immersive journey into the realm of object recognition. Join us in this blog post as we unveil an object recognition application, powered by Azure AI Vision, Streamlit, and Docker.
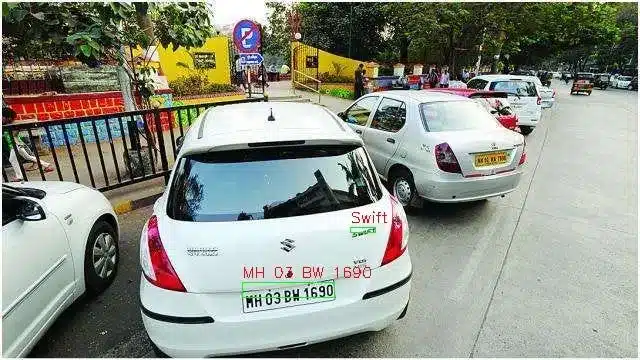
By the end of our guide, you’ll wield a local app with the power to identify humans, cars, text, and even vehicle number plates. What’s more, we’ll store this invaluable data in Azure Blob’s JSON files, complete with neatly labeled images adorned with bounding boxes, simplifying your reference needs.
Setting Up the Environment
Before we delve into the code, let’s make sure our environment is ready for this thrilling project. To kickstart our journey, we’ll assemble the necessary tools and libraries:
- Azure Cognitive Services Account: To utilise Azure AI Vision.
- Streamlit: For creating the user-friendly interface.
- Docker: For containerisation and easy deployment.
The setup process is relatively straightforward, and we’ll guide you through each step with clarity and ease.
Azure AI Vision Setup
Our first step is to set up Azure AI Vision, a powerful image analysis service provided by Microsoft Azure. You’ll need to create an Azure Cognitive Services account and obtain the necessary API keys to use this service.
Creating a Streamlit App
Streamlit is an incredible tool for creating web applications with minimal code. In this app, we’ll integrate Azure AI Vision to recognise various objects in images, such as humans, cars, text, and number plates.
Storing Results as JSON and Labeled Images:
As the app recognises objects in images, we’ll structure the results as JSON data. This will include information about the type of object, its location, and a confidence score. Additionally, we’ll create labeled images with bounding boxes around the recognised objects and save them in a separate folder.
Dockerising Your Steamlit App
Dockerisation allows you to package your Streamlit app and its dependencies into a container, ensuring easy deployment and consistent behavior across different environments. We’ll provide a Dockerfile and explain its contents to help you containerise your Streamlit app.
Section 1: Importing Libraries and Setting Up Connection
In this section, we’re preparing our development environment by installing the necessary libraries and tools. Here’s the code:
					import streamlit as st
import tempfile
import azure.ai.vision as sdk
import os
import cv2
import json
import numpy as np
import re
from azure.storage.blob import BlobServiceClient
import requests
					STORAGE_CONNECTION_STRING = "BlobEndpoint= ... (your Azure storage connection string here) ..."
blob_service_client = BlobServiceClient.from_connection_string(STORAGE_CONNECTION_STRING)
- We start by importing the necessary libraries for this project.
- The
STORAGE_CONNECTION_STRINGis a placeholder for your Azure storage connection string, which you would replace with your actual credentials. - We create a
BlobServiceClientto interact with Azure Blob Storage.
Section 2: Azure AI Vision Setup
Now, let’s set up Azure AI Vision. You’ll need an Azure Cognitive Services account and API keys. Here’s the code:
					# Service options
service_options = sdk.VisionServiceOptions(endpoint: str, key: str)
					# Load the Azure AI Vision SDK service options
analysis_options = sdk.ImageAnalysisOptions()
analysis_options.features = (
    sdk.ImageAnalysisFeature.CROP_SUGGESTIONS |
    sdk.ImageAnalysisFeature.OBJECTS |
    sdk.ImageAnalysisFeature.PEOPLE |
    sdk.ImageAnalysisFeature.TEXT |
    sdk.ImageAnalysisFeature.TAGS
)
- Configure the Azure AI Vision service options with your Azure Cognitive Services API endpoint and API key.
analysis_optionsspecify the features you want to extract from images, such as object recognition, text detection, and more.
Section 3: Image Processing Functions
This section defines various functions for image processing:
					def calculate_bounding_box(bounding_boxes):
    min_x = float('inf')
    min_y = float('inf')
    max_width = 0
    max_height = 0
    for box in bounding_boxes:
        x, y, width, height = box
        # Find the minimum x and y coordinates
        min_x = min(min_x, x)
        min_y = min(min_y, y)
        # Find the maximum width and height
        max_width = max(max_width, width)
        max_height = max(max_height, height)
        st.write(max_width,max_height)
    return int(min_x), int(min_y), int(max_width), int(max_height)
					def bounding_polygon_to_boxes(bounding_polygon):
    bounding_boxes = []
    num_points = len(bounding_polygon)
    for i in range(0, num_points, 2):
        x1, y1 = bounding_polygon[i], bounding_polygon[i + 1]        if i + 2 < num_points:
            x2, y2 = bounding_polygon[i + 2], bounding_polygon[i + 3]
        else:
            # If the last point is reached, connect it to the first point to close the polygon
            x2, y2 = bounding_polygon[0], bounding_polygon[1]        # Find the minimum and maximum coordinates for each axis
        min_x = min(x1, x2)
        max_x = max(x1, x2)
        min_y = min(y1, y2)
        max_y = max(y1, y2)
        # Add the bounding box to the list
        bounding_boxes.append((min_x, min_y, max_x - min_x, max_y - min_y))
    return bounding_boxes
					def read_image_from_url(url):
    response = requests.get(url)
    image_array = np.asarray(bytearray(response.content), dtype=np.uint8)
    img = cv2.imdecode(image_array, cv2.IMREAD_COLOR)
    return img
					def draw_bounding_boxes_with_text(image_path, bounding_boxes, output_path, container_client):
    container_name = ""
    blob_name = "*.jpg"
    container_client = blob_service_client.get_container_client(container_name)
    # Retrieve the image from Azure Blob Storage
    st.write('1')
    blob_client = container_client.get_blob_client(blob_name)
    image_stream = blob_client.download_blob().readall()
    st.write('2')
    # Modify the image using OpenCV
    image_array = np.frombuffer(image_stream, dtype=np.uint8)
    img = cv2.imdecode(image_array, cv2.IMREAD_COLOR)
    url = https://<StorageAccountName>.blob.core.windows.net/<StorageAccountContainer>/<ImageName>
    image = read_image_from_url(url)

    for boxes, text in bounding_boxes:
      st.write(boxes, text,len(boxes))
      if len(boxes) > 0:
        # Draw the first bounding box in each element of the input_data array
        x, y, w, h = map(int, boxes[0])
        x, y, w, h = calculate_bounding_box(boxes)
        cv2.rectangle(image, (x, y), (x + w, y + h), (0, 255, 0), 1)
        cv2.putText(image, text, (x, y - 5), cv2.FONT_HERSHEY_SIMPLEX, 0.5, (0, 0, 255), 1)
    st.write("draw_bounding_boxes_with_text sccess",image)

    cv2.imwrite(temp_file_path, image)
    new_blob_name = st.text_input("Enter the new blob name:")
    with open(temp_file_path, "rb") as data:
      new_blob_client = container_client.get_blob_client(new_blob_name)
      new_blob_client.upload_blob(data)
These functions handle tasks like generating annotated paths, calculating bounding boxes, converting bounding polygons to boxes, reading images from URLs, and drawing bounding boxes with text.
Section 4: Image Processing With Azure AI Vision
Here’s the code for processing images and generating JSON output:
json_out = []
def process_image(image_path, container_client):
st.write(image_path)
vision_source = sdk.VisionSource(url=image_path)
image_analyser = sdk.ImageAnalyser(service_options, vision_source, analysis_options)
result = image_analyser.analyse()
st.write(result.reason)
if result.reason == sdk.ImageAnalysisResultReason.ANALYSED:
lst_bounding_boxes = []
if result.text is not None:
st.write("Text:")
for line in result.text.lines:
bounding_boxes = bounding_polygon_to_boxes(line.bounding_polygon)
tuple_bounding_box = (bounding_boxes, line.content)
lst_bounding_boxes.append(tuple_bounding_box)
points_string = "{" + ", ".join([str(int(point)) for point in line.bounding_polygon]) + "}"
#st.write(" Line: '{}', Bounding polygon {}".format(line.content, points_string))
data = {
"image": image_path,
"detectedword": line.content,
"detectedpolygon": points_string
}
json_out.append(data)
for word in line.words:
points_string = "{" + ", ".join([str(int(point)) for point in word.bounding_polygon]) + "}"
st.write(" Word: '{}', Bounding polygon {}, Confidence {:.4f}"
.format(word.content, points_string, word.confidence))
output_image = ""
draw_bounding_boxes_with_text(image_path, lst_bounding_boxes, output_image,container_client)
else:
error_details = sdk.ImageAnalysisErrorDetails.from_result(result)
st.write("Analysis failed.")
st.write("Error reason:", error_details.reason)
st.write("Error code:", error_details.error_code)
st.write("Error message:", error_details.message)
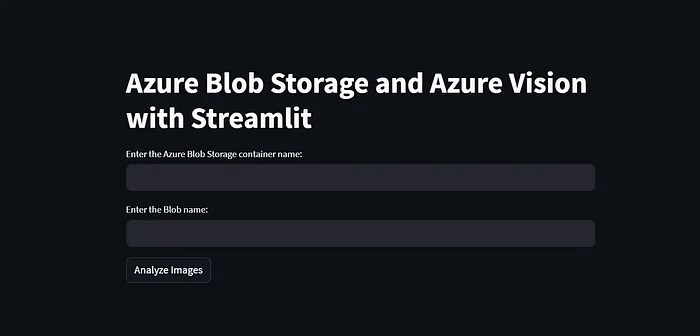
st.title("Azure Blob Storage and Azure Vision with Streamlit")
container_name = st.text_input("Enter the Azure Blob Storage container name:")
blob_name = st.text_input("Enter the Blob name:")
- The
process_imagefunction is responsible for processing an image using Azure AI Vision. - It extracts various types of information from the image, including objects, tags, text, and more, and stores the results in
json_out.
Section 5: Main Streamlit App
The main Streamlit app is defined in this section:
					def main():
    if st.button("Analyze Images"):
        container_client = blob_service_client.get_container_client(container_name)
        blob_list = container_client.list_blobs()
        for blob in blob_list:
            if blob.name.startswith(blob_name) and blob.name.endswith(('.jpg', '.jpeg', '.png', '.gif')):
                image_url = f"https://{blob_service_client.account_name}.blob.core.windows.net/{container_name}/{blob.name}"
                process_image(image_url, container_client)
if __name__ == "__main__":
    main()
- The
mainfunction handles the main functionality of the Streamlit app. - When the “Analyse Images” button is clicked, it retrieves a list of blobs in the specified container and processes images that match the provided blob name and have image file extensions.
- The
process_imagefunction is called to analyse each image.
Conclusion:
You’ll have a powerful object recognition application at your disposal. With Azure AI Vision, Streamlit, and Docker, you can recognise and analyse objects in images like never before.
In the empire of AI and computer vision, the horizons stretch far and wide, limited only by your imagination. May this guide ignite the spark of your creativity, propelling you towards a future brimming with exciting applications and groundbreaking innovations. Get ready to code your way to success!